Previously on…
If you haven’t done it already, I strongly recommend reading part 1 of this article, which provides the necessary context and preparation of building a repository in SharePoint.
Kick-off the development process
Constructing the building
After all the prep work I was glad I could start working on the most fun part of the project: creating a Document Library!
![]()
The 10 columns of our repository
I started with creating the columns: ‘normal columns’ and ‘Managed Metadata columns’. In total I created 10 columns, 3 of them being normal columns: the name, a description (multiple lines of text) and a date published column (Date and time), 7 of them being managed metadata columns (with the topic term set being used twice: for the Primary and Secondary topics column).
To ensure the findability of the files, I made sure to turn on the ‘require information’ toggle for each managed metadata column, so each file requires at least one term per column.
We found that this required function can be buggy at times, though generally speaking it works well and allows for no file to get ‘lost’ in the content jungle!

Toggle setting for requiring terms
Having the wiring done
As you can imagine, it was a very satisfying yet nerve wrecking moment to upload all files into our Document Library.
Initially I wanted the assigning of terms to the files (tagging) to be a team activity to familiarize my team with the act of tagging and speed up the overall process. Unfortunately, they only had limited hours to support me in the process, so I eventually did most of the tagging myself. Because I created the terms and term sets myself, I knew them by heart, which helped me select the correct terms quickly!
Don’t underestimate the work that goes into tagging, it’s very time-consuming as you will need to read through all the files in order to select the right terms that explain the content best! I remember spending 2–3 days on this.
Passing the quality inspection
Filters
To make sure only fully tagged files become visible in our repository, I applied filters. I had never done this before, so it meant going back and forth a lot and asking colleagues outside of my team to confirm whether certain files were visible for them or not. I ended up applying the following filter to the All items-view:
[Column name] is not equal to blank
Approval flow
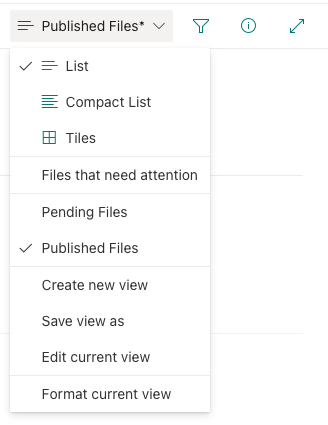
My team didn’t want visitors of the repository to view files that were a work in progress, so I setup an approval flow, which hides files until they are manually ‘approved’ by one of my team members. This automatically created two different ‘views’ in the Document Library:
- Approve/reject Items
- My submissions
Only the owners of the communication site (my team) can alternate between these views. We changed the names of both views to “Pending Files” and “Published Files”.
I only found out later that when changes were made to a (published) file by one of my colleagues, it would automatically be sent back to the Pending Files view. This can sometimes be annoying, and we regularly check in with each other whether the files in the Pending Files are indeed pending or should be published (again).

The 2 different views of our repository: ‘Pending’ and ‘Published Files’
Maintaining your building
Hiring property management
Like a real building, a repository needs “property management’’ to make it a success. It requires maintenance. So even though I was thrilled to finally have something in place from which we could easily save and share our insights, I knew my work wasn’t done.
I am the ‘property owner’ of my team’s repository, and my maintenance tasks range from improving our terms and templates to troubleshooting unknown errors. As part of our communication strategy, I also track the site usage to see how many people have visited the repository, and what the most popular files of that week were. For example: In May 2022, we had 146 stakeholders that had visited our repository at least once (either by opening one of our files or browsing through it). In May 2023, this number had risen to 277! That’s 89.7% more reach in one year!
“I go to the repository to refresh my memory.”
(Quote from this year’s stakeholder interviews)
Besides that, I also do quarterly ‘tag quality checks’ to ensure terms are used correctly and to provide clarification where needed. At the beginning of this year, I conducted several stakeholder interviews, to learn how they access and scan content in the repository. Based on those insights I made certain changes to improve their user experience.
Organizing an opening party
To make everyone aware of its existence, I used our company’s weekly opening meeting to officially ‘launch’ our repository. This went hand in hand with an announcement in the Posts ‘tab’ of our newly created Teams channel (see: part 1 of this article), where I tagged the channel so everyone would get notified.
To be honest, this ‘opening party’ is still going on. My team and I mention, link, and share about our repository wherever and whenever we can. Since its launch, my team has actively been using the ‘Post’ tab of our Teams channel to share insights, announcements, ‘insights nuggets’ and teasers of upcoming research studies. Whenever my colleagues are presenting their insights during a meeting, we always try to include a link to the insights presentations and the repository in the meeting chat. We track all of these communication instances in a spreadsheet, which is used to identify best practices and improve the way we communicate.
As our company is growing and people just naturally forget, I’m always trying to come up with strategies to keep our repository on top of people’s minds and as visible as possible. This is an ongoing process!
To summarize
- Create a Document Library in the agreed-upon location (if Document Library is the setup you’re going for).
- Create your (managed metadata) columns based on your taxonomy and decide whether to make them ‘required’ or not.
- Move your content over to the Document Library (yeey!)
- Assign terms to each file. Don’t underestimate the time that goes into this, and make it a team effort if possible (at least to familiarize everyone with the act of tagging).
- Set the right view for your repository by using filters.
- Decide with your team whether you want to set up an approval flow in your repository or apply your view filters accordingly.
- Settle in your position as ‘property manager’ and plan your maintenance (I strongly recommend already agreeing on who this is at the start of this project).
- Announce the launch of your repository in the desired communication channel(s), and find ways to keep promoting it to keep it on people’s minds!
- Stay curious! There are plenty of ways to improve your repository. Dedicate some time to explore opportunities.
And they lived happily ever after
To live happily ever after, a repository needs to continuously evolve. Some things I have in the pipeline for this year include…
- Doing a course in Microsoft PowerAutomate and PowerApps, so I learn how to build more advanced flows and apps which might help me simplify repository processes and minimize the time spent on manual tasks.
- Imbedding the repository in the company’s onboarding process, so new employees know of its existence from the moment they join our company.
- ‘Centralizing’ the different types of repositories our company has, by finding ways of connecting or displaying them in the same location.
Before I lock the door…
Regardless of which tool you’re using, building a repository takes a lot of time. You either purchase it, or you build it with the tools you have, like me. In any case, it’s absolutely worth the time investment, and I hope that by sharing my experience I have inspired and / or motivated others to bring order to our modern file landscape!
I’d love to hear what you think so feel free to connect with me on LinkedIn. I’m always looking for fellow librarians or ReOps enthusiasts to learn from and exchange best practices 🙂
NOTE: This article is not covered by the ResearchOps.Community CC Attribution-Sharealike International Licence
