I am in a meeting with my team and just told them that we (my Lead and I) decided to build our research repository in SharePoint. For a second, no one is saying anything.
Colleague: “How do you mean we’re going to use SharePoint? What will that look like?”
I knew my team was not going to jump of excitement when I would share this decision. Because let’s be honest: SharePoint is not a specialized repository tool and it’s also not the ‘coolest tool’ in town. So, I had to sell it to my team.
“We already have the Microsoft Suite, which means it’s basically a free tool and everyone has access to it by default. It does not need to go through procurement, so we will save a lot of time there. Also, everyone is already familiar with SharePoint in one way or another, so our stakeholders do not need to get used to yet another new tool. Plus, it does not have a complicated UI, it is fairly straight forward. Not to forget it will be easy to move content over internally. I have checked out SharePoint’s functionalities and I am positive I can build a repository in it.”
*Silence*.
“Trust me.”
Let’s rewind: how did I get to this point?
When I joined my company, research insights were saved in PowerPoint and Word files and lived in a confidential folder that only the research team could access. Stakeholders would reach out to one of my team members and they would dig up the insights for them, or the team would grant them access to the folder through a sharable link.
The need to build a repository was initiated by my Lead (our Head of Research and Insights) very early on in our company’s existence and was one of the reasons she pushed for a Research Operations position on the team. By then the company only existed for less than 1.5 years. With a repository, we would not only be making research insights accessible for every department, but also reducing ‘time waste’ by streamlining certain processes and working with the tools we already have. This would also align with two of our company’s pillars: customer-centricity and sustainability.
To be honest, I also had to convince myself that this could be achieved with SharePoint so I did a little deep dive into its features. And to my surprise…
SharePoint was not all bad!
In the process of developing our repository I didn’t find a single article or blog of someone who had done what I was trying to do, and I really missed having an example to work from. After the repository was built, I decided to write this article to share my experience.
Whether you are looking to build a repository yourself, or just want to better organize your files, this article shows you can do this on no budget as long as you know which tools to use (and how)!
Disclaimer: In this article I will be using SharePoint terminology. SharePoint is a tool for creating web sites, publishing content, and storing files. A basic familiarity with the tool will help, however, I did include links that lead to more information about each term.
When I talk about a repository, I mean a database that helps organisations manage, share and access research datasets for decision-making. A central place where people in our organization can go to find the latest insights from our research team.
I work for a PropTech (Property Technology) company. And the more I think about it, the more similarities I see between building a repository and developing a building. So, in this article, I will walk you through the groundwork and planning, how I prepared the ‘building site’, kicked-off the development process and eventually maintain the building (aka repository).

Groundwork & Planning
Creating a blueprint
After aligning on the scope of the project I organized a number of workshops to gather the needs and expectations of my team and the stakeholders that we knew would make use of our repository most once it was finished. I also asked them to explain to me their current way of sharing and accessing insights, to learn about their pain points and how long it took them to find and access the insights they were looking for (which turned out to be 30 minutes on average!).
I’m glad I took the time to do this as the insights from these workshops gave me a clear indication of the ‘must haves’ for the repository and helped me measure its success. For example, this is a quote from one of those same stakeholders after the launch of the repository:
“I was looking for a report that X shared, and I went to the repository and found it in 30 seconds!”
That’s 29.30 minutes quicker than before having a repository!
Bringing in the expert knowledge
As I wasn’t a SharePoint expert (more like a self-taught SharePoint geek) I had to deep dive into the world of SharePoint to find out which features and functionalities would support the ‘must haves’ of this repository. I started gathering everything I could find about relevant SharePoint’s functionalities in a Miro board:
- Links to articles
- Webinars
- Screenshots
- YouTube tutorials (I’m a big fan of Kevin Stratvert and SharePoint Maven)
- This Miro board ended up being my lifeline and I shared it with many stakeholders, so they didn’t have to reinvent the wheel.
Based on the research I had done, I decided to create a repository in a Document Library. Document Libraries are designed for storing documents and come with more document management functionalities than Microsoft Lists. Because our team documents their insights in PowerPoint and Word files, choosing a Document Library made sense.

Deciding on the design
Before I could continue, I had to decide what type of files would ‘live’ in our repository, which would be accessible to everyone in our company. Together with my team we decided on the following files:
- Research Project Brief: A Word document containing a project’s framework e.g., objectives, background, sample, and methodology, enabling researchers to plan and conduct research.
- Written Report: A written text document, often a Word file, that allows for storytelling and includes different data types, studies, or strategic content.
- Insights Presentation: A PowerPoint deck used for presentations and visualization of insights, containing the context of a particular research project, the generated insights and the next steps.
- Later we would also add some training materials to the repository.
Agreeing on its location
To be honest, when starting this project, I didn’t know much about SharePoint’s infrastructure and permission management, so I asked our IT team to explain it to me. This helped me identify possible locations for our repository.
Communication site
We initially built our repository in an already existing Teams-connected site, however, I quite quickly learned this isn’t the way. We weren’t the ‘owner’ of the site which meant we didn’t have permission to optimize or customize the Document Library, nor were we able to adjust the visitors’ access rights — meaning every visitor was able to make changes to our PowerPoint decks.
For this reason, IT and I decided it would be better to move our Document Library to a stand-alone communication site where my team would be the sole owner off, giving us total freedom to build whatever we’d like. Looking back, I wish I had created a communication site from the beginning to save myself some headaches and a lot of time.
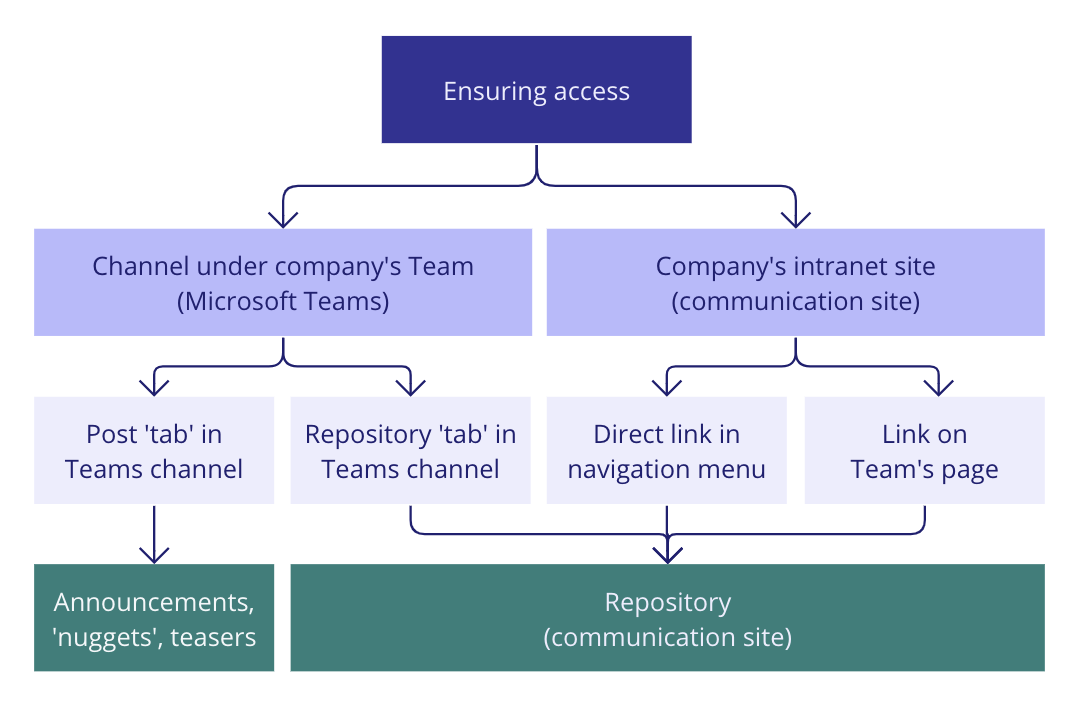
Ensuring access
To ensure everyone within the company has (visitor) access to our communication site by default, I linked it to the following communication channels:
- A channel which our IT team created for me, that lives ‘under’ our company’s Team in Microsoft Teams.
- The navigation menu of our company’s communication site.
- Our team’s page (which lives on our company’s communication site).


Preparing the building site
Collecting the building materials
Before I joined the company my Lead and another colleague had already gathered all research files from the deep, dark corners of our company and had archived them in one folder, #timesaver! I moved the files that would eventually end up in the repository into a separate folder so when the time would come, I would be able to move them to the repository in one go.
Important: I moved the files; I didn’t copy them over. We didn’t want to have multiple copies of the same file living in different locations. It would only cause confusion down the line.
Having your paperwork in order
Templates
Preparing the files took more time than I thought (and that’s not just because I’m a perfectionist). For consistency and have some kind of quality standard my team and I decided that every insights presentation should have the same template going forward. I was glad to find out that you can add templates to a Document Library. This way, my colleagues would be able to create a new insights presentation from a template, which would automatically be saved within the Document Library. No need to move files manually!
Quality check
I went through all the files to make sure they had the template and that they were in line with our naming convention. A naming convention had already been enforced by my Lead before my time, which saved me a lot of work. Besides that, I also made sure all insights presentations were pseudonymized, to guarantee our research participants’ privacy. I must say I’m lucky my team existed less than 1.5 years by the time I joined, so the backlog wasn’t massive.
Our initial fear was that stakeholders would be able to make changes to the files’ content if we wouldn’t convert all files into PDFs. However, I quickly realized that by default the visitors of our repository would receive the ‘Visitor’ permission level, which didn’t allow them to edit or delete content.
Gathering your tool sets
Terms and term sets
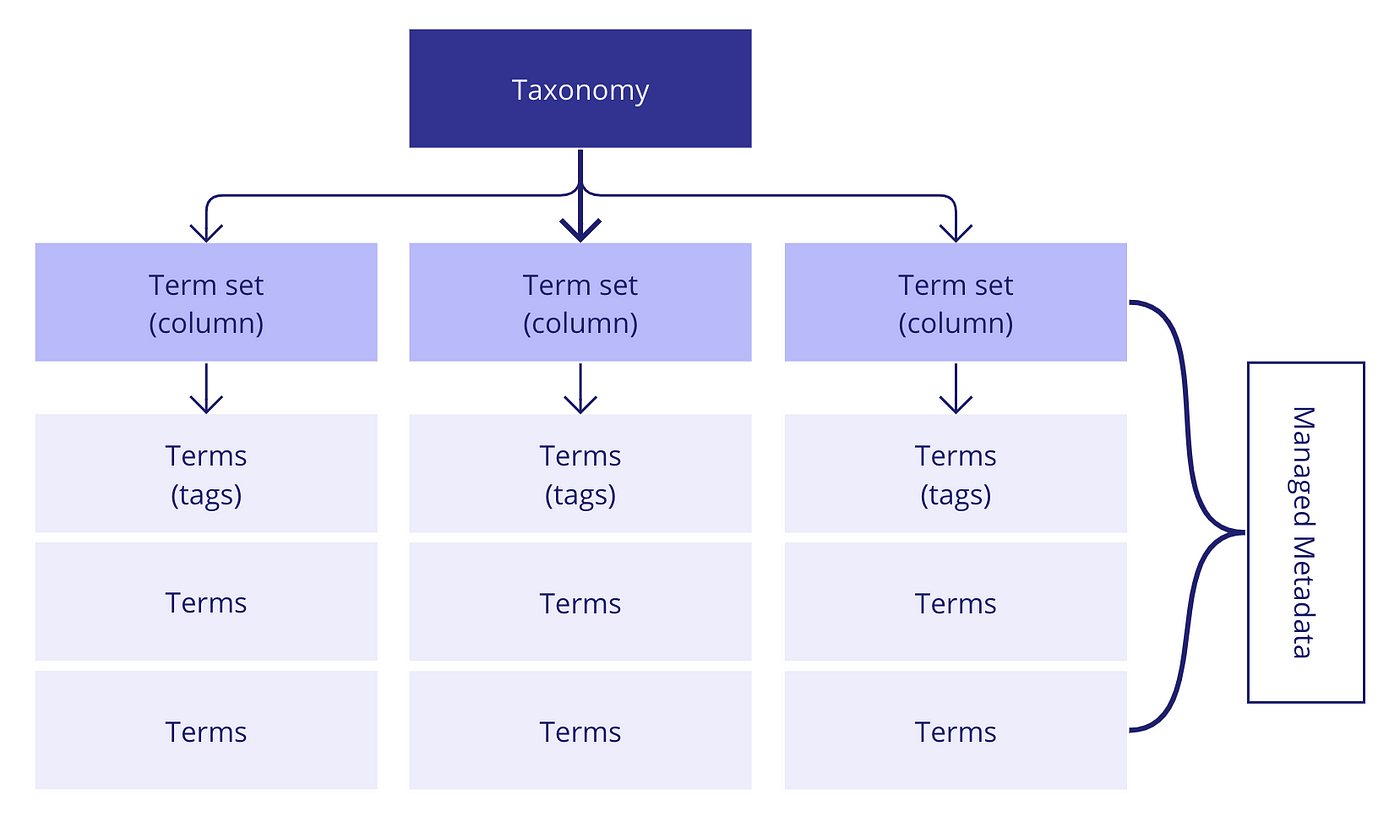
I had decided to use terms (tags) and term sets (columns) in my Document Library, also called ‘Managed Metadata’. Managed Metadata allows you to filter through files quickly and easily, and considering I expected the number of files in our repository to grow rapidly, I figured this was a must have. I asked our IT team to crown me “Term Store Admin” (Queen of Libraria, Safekeeper of the Terms, Breaker of Silos) so I would be able to create terms and term sets in the Term Store Management tool, where all terms and term sets are managed.

Taxonomy
I put on my researcher hat and conducted a series of card sorting workshops with 16 stakeholders from various departments. The goal of these workshops was to identify terms and term sets for my taxonomy and eliminate any jargon that might not be understood by stakeholders. I wanted to agree on a ‘shared language’ and create an Information Architecture for our repository that would work for the majority of the company.
What we preach as a team we also apply to our own internal products and processes, which is to make data-driven decisions and listen to our (in this case internal) customers by conducting card sorting workshops.
One of the things I discovered during the card sorting workshops was that some teams had a completely different interpretation of the same term or named terms differently than others. Learning about this let me to adjust the wording of certain terms and term sets so the meaning is clear for all teams. The workshops also helped me understand how stakeholders prefer to filter through content which allowed me to identify the future columns of the Document Library.
Doing card sorting workshops sounds like a lot of work and that’s true. It did take me a few weeks in total. However, it helped me to create a solid set of first terms and term sets which until this day are being used (and understood!) by the majority of stakeholders.
The trick with creating a taxonomy is to start small. It is tempting to add a lot of terms and term sets to your first taxonomy –and I admit I did slip in a few in that I wasn’t entirely sure about — but removing or renaming those because they’re not being used or understood is more time consuming than adding them on the long run (which is what happened to the unclear terms I slipped in).
To summarize
- Take the time to understand your stakeholders’ pain points and wishes for the repository. This will help you get a better understanding of the ‘must haves’ and allows you to measure its success.
- Do your research and organize your thoughts by gathering your findings and resources in one place. Base your decisions on this ‘foundational knowledge’.
- Together with your team, agree what type of content will live in your repository and who needs access to it.
- Decide on your repository’s location from an access point of view: which location comes with the desired access rights and flexibility, and how do you ensure people have access to it?
- Move the content that will live in the repository to one place, for easy access and to do a ‘quality check’.
- With your team, decide on quality standards for your content and create your template(s) based on this.
- Hold the content against your guidelines and template(s): get it in shape for the upload!
Base your taxonomy on research, ideally a card sorting workshop. This ensures you have a strong set of terms and term sets to build upon. Keep your first taxonomy lean and use managed metadata to support it!
The story continues…
Curious how I went about building the actual repository in SharePoint, and have been maintaining it since? Then have a look at part 2 of this article were I cover the above, and more!
NOTE: This article is not covered by the ResearchOps.Community CC Attribution-Sharealike International Licence
